
 Anti-detect Browser


-
29392อันดับโลก
-
969อันดับประเทศ/ภูมิภาค
-
1.61Mผู้ติดตาม
-
420วิดีโอ
-
23.22Mชอบ
-
วิดีโอใหม่5
-
ผู้ติดตามใหม่3.49K
-
มุมมองใหม่1.17M
-
ไลค์ใหม่66.17K
-
รีวิวใหม่473
-
แชร์ใหม่6.41K

Joesgarden เทรนด์ข้อมูล (30 วัน)
Joesgarden การวิเคราะห์สถิติ (30 วัน)

Joesgarden วิดีโอยอดนิยม

Joesgarden


Today we are back and I am showing you one of my favourite tips when it comes to watering your plants, specifically plants which you are growing in containers. Pots and containers are a great way to grow crops, plants, flowers and even trees, however, there is often one mistake we all make when it comes to watering them. Most containers will have a slight gap between the soil and inner side of the pot, this is especially the case with plastic pots. As water will always travel down the path of least resistance, it will funnel down the sides of the pot and out the drainage hole in the bottom. This can sometimes leave the middle of the root ball dry. Now to solve this issue it is often best to water plants (especially small plants in seed trays and small pots) through the drainage holes in the bottom. This way you guarantee an even drink all the way through the soil. The bowl in this video was more for show, I like to get big metal trays so I can do 20 or 30 pots at a time 😊 Obviously we all water from the top, myself included, and it is absolutely fine to do so. Just take the time to make sure the water has gone where you wanted it to go, by poking a finger down into the soil. But if you have the time and a large water tight tray try watering from the bottom from time to time too 😊 If you have large containers, you can’t water them from the bottom, but if you bury a smaller pot with drainage holes, you can water directly into this, which will funnel the water right to the plants roots where it’s needed most 😊 Thank you so much for watching, I love you all, Joe 😊🌱💚 #watering #gardeningtips #planttips #zerowaste #ecotips
558.68K
 25.16K
 4.5%
4.5%
 0
0
 132
132
 2.44K
2.44K
Joesgarden
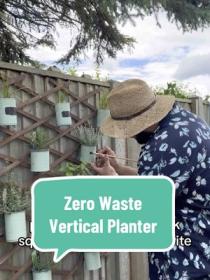
Today we are back and I am showing you one of my favourite DIY zero waste project to do this spring in the garden. All you need is a few old tin cans, a few screws and some trellis. Spring is fast approaching which has got me thinking about my favourite ways to help people who may only have a small space or garden to grow food. Without doubt the best way to grow food and plants in a small space is to use vertical gardening techniques. Now there are so many ways you can garden vertically, but some of the equipment you can buy is just so expensive! So instead why not try to use what you have around the house such as tins. Now I would like to make a few important points. The bigger the tin the better, as small containers will dry out fast throughout the day, and where possible use lined tins. If you look closely the tins I am using have a white liner on the inside, which is commonly used with tins that store something in water. These are really slow to rust and I’ve had some in my garden for nearly three years with no sign of rust at all. The paint I’m using is @protekwoodstain, as it is animal, plant and eco friendly making it safe to use around your crops. It also adds a layer of protection and also helps to stop any glare, and prevents the tins from getting too hot in the summer sun. These planters are best when planted with really small plants such as chives, pansy and alpine strawberries, and just make sure to keep harvesting to keep your plants small. Thank you for watching, and I love you all, Joe 😊🌱💚 #verticalgardening #verticalgarden #gardentips #zerowaste #containergarden
481.16K
27.14K
5.64%
2
213
6.19K
Joesgarden

Today we are back and I am showing you one of my favourite ways to keep my house and garden plants watered while I am away on holiday for a few days. Where possible it is best to ask family and friends to look after your plants while you are away, but sometimes that is not possible. So here is my next best solution to help give your plants a slow release drink, which can buy you some time until you get back home. It is important to remember this will only work on you plants for around 2-5 days depending on a few factors such as the flow, weather and the size of your bottle, but it is far better than nothing at all. This method of watering, which is commonly known as drip irrigation, is used around the world in most farms, plant nurseries and garden centres as it is a super targeted way of getting water exactly where you need it, helping not only to water each specific plant, but also to reduce water waste. When I go away I like to set the flow to its slowest possible setting to prevent the water running out too fast, but please make sure if you are using this method for containers, check they have drainage holes in the bottom to prevent the pots from becoming water logged, which can kill your plants just was fast as no water can. I hope you are having a lovely week, and I love you all, Joe 😊🌱💚 #watering #gardentips #zerowaste #gardening #planttips
357.32K
14.92K
4.18%
3
104
2.34K
Joesgarden

Today we are back and I am showing you one of my favourite ways to use up all that extra left over cardboard from deliveries. I’m sure most of you like me, from time to time order something which arrives in a cardboard box. Well instead of throwing them away, they are actually very useful around the garden. There are two more main ways to use cardboard around the garden which I haven’t shown here, but I will quickly mention them. Cardboard is a vital ingredient in compost, so I like to keep a load next to my compost areas, so when a bit of green waste goes in I can top it up with cardboard. It also acts as a brilliant weed membrane for no dig beds too. However this is my favourite way to use it up and it’s also one which saves me a lot of money each year. Cardboard can be turned into pots which are ideal for seeds and seedlings as they are free, but can also be transplanted whole once the seedling is big enough. This helps avoid root disturbance and makes your life a little bit easier too. These little pots are surprisingly sturdy, but please make sure you are not overwatering, as not only is that bad for your plant, the cardboard pot will break down if saturated. Give them a go and let me know how you get on, Thank you for watching, and I love you all, Joe 😊🌱🙏 #zerowaste #gardening #Sustainability #gardentips #ecotips #gardeningtips
316.67K
21.67K
6.84%
5
113
3.42K
Joesgarden

Today we are back and I am showing one simple plant which I believe has a place in every garden, no matter the size. Nasturtiums can be seen all over my garden, and there are so many reasons why I recommend you do the same. Not only are nasturtiums a very pretty and easy to grow flower, they are possibly the most useful plant I’ve got in the garden. Every part is completely edible, and I think is delicious when added to a summer salad, giving off a taste similar to rocket. They are super simple and easy to grow, and once planted out will pretty much look after themselves. But the main reason I grow them is for organic pest control. They are a magnet for slugs and other critters, which helps keep them away from your more prized crops. Not only that, cabbage butterflies love to lay their eggs underneath nasturtium leaves, which again keeps them off your brassicas and other more valuable plants. Not only are they super useful, but if you plant one or two nasturtium plants, you will have them pretty much for life. While they will die back each year, they will self seed. The following spring you will notice lots of little nasturtium seedlings popping up in that area. Thin them out and keep the strongest to start the cycle all over again. I hope you are all having a lovely week, thank you for watching and I love you all, Joe 😊🌱💚 #nasturtium #gardening #Sustainability #gardentips #ecotips #zerowaste
212.88K
13.39K
6.29%
0
147
1.41K
Joesgarden

Today we are back and I am showing you from start to finish how to grow more fresh summer tomatoes than you will know what to do with, and it all starts with just a handful of heirloom seeds sown in a pot. I adore growing fresh tomatoes at home, as the taste is unrivalled to those you buy in the shops, and they also have so many amazing uses in the kitchen. Tomatoes are surprisingly easy to grow, and pretty much anyone can grow them at home as they come in all shapes and sizes. It is worth noting the advice in this video is for the most part for vining varieties. Bush varieties can just be left to grow and you don’t have to worry about supports, planting deep or removing side shoots. As you tomatoes grow they will benefit from a by weekly feed of liquid seaweed or similar. I usually start to feed as the first flowers start to appear. To guarantee the best harvest grow in a warm sunny location and keep the soil moist throughout the growing period. Towards the end of the season prune back branches and leaves to allow the remaining fruits to ripen, and any green tomatoes can be harvested before the first frost, and ripened in a draw with a banana. If you are growing heirloom seeds, don’t forget to keep a few before the plant dies back, to use again and again each year. Plus each year the seed will become more suited to your growing space, which is a big bonus. Thank you so much for watching, I love you all, Joe 😊💚🙏 #tomato #gardening #gardentips #zerowaste #harvest
132.87K
9.85K
7.41%
0
50
644
Joesgarden

Today we are back and I am showing you one of my favourite garden tips, to grow an almost endless supply of tomatoes all summer long, and it all starts with just a couple of cheap little tomato plants from the shops. Tomatoes have to be one of my favourite crops to grow, as not only are you spoilt for choice when you grow your own, but the flavour truly is one of summer times real treats. I love to add them to salads, make fresh pasta sauce, or even just enjoy straight from the vine. And believe it or not you really don’t need much room to grow many tomatoes, due to their vertical growing ability. As few as four tomato plants will easily give you all you need for the summer, but as it’s easy and free to propagate more, then why not? 🤣 Now it is worth noting this method is best used to grow vine or indeterminate tomato varieties rather than bush or determinate varieties. All you need to do is let a few side shoots develop, then once they are about 6 inches long, snip them off and pop them in some water. After a week or two, they will have roots and can be potted on, to make a free tomato plant. These plants will be genetically identical to the plant you took the cutting from, so it is ideal to use on your favourite varieties. As tomatoes have a long growing season, you should really aim to start taking cuttings in May or very early June, to have any realistic chance of getting fruits before it gets too cold. Having a greenhouse or polytunnel will extend this a touch. In the past I have successfully kept a few cuttings from my favourite varieties on a windowsill overwinter, which has not only preserved that variety, but has given me a head start the following spring. This overwintering is made a lot easier if you have a grow light. Thank you so much for watching, I love you all, Joe 😊🌱💚 #tomato #gardening #gardentips #zerowaste #harvest
55.79K
5.23K
9.37%
0
29
339
Joesgarden

#ad Today, we're back, and I'm sharing my top watering tips for your garden and houseplants this spring with Affinity Water. Spring is the time of year when our gardens and houseplants come to life, which, for me, is the most exciting time. However, it's also when our water usage can dramatically increase. Luckily, there are many quick and easy tips we can use at home to reduce our water consumption while keeping our plants healthy and happy. Many are as simple as upcycling waste destined for the bin or reusing water from cooking, which not only cuts down on waste but can also help save you money! So, consider how you might save water around your home, and please share any ideas in the comments below. If you'd like to be rewarded for saving water at home, please join me in Affinity Water's My Water Footprint Challenge, where you can win fantastic prizes such as Water Butts, RHS and National Trust memberships, family trips to Hertfordshire Zoo, gardening bundles, and more. You can join via the link in my bio. 😊 Thank you for watching. Joe #gardeningtips #watering #affinitywater #zerowaste #planttips #SaveOurStreams #AffinityWaterChallenge
34.76K
2.26K
6.51%
0
25
152
โปรดเข้าร่วมกลุ่ม Facebook แรงบันดาลใจ TikTok ของเรา
เราจะแชร์วิดีโอสร้างสรรค์ล่าสุด และคุณสามารถพูดคุยเกี่ยวกับคำถามใดๆ ที่คุณมีกับทุกคน!

TiktokSpy from IXSPY
เครื่องมือดิจิทัลสำหรับผู้มีอิทธิพล เอเจนซี่ ผู้โฆษณา และแบรนด์
บริษัทบุคคลที่สามอิสระ ไม่ใช่เว็บไซต์ทางการของ TikTok
Copyright@2021 ixspy.com. All Rights Reserved


